Intended Audience

This page is intended for current Oregon Tech students who are already registered with our office.  

If you are not registered with our office, visit our Get Started page for more information on starting the interactive process.

Detailed Info on Canvas!

When you are registered with our office, we will invite you to join a resource course in Canvas ("Student Accommodation Resource Center").  Once the invitation is accepted, the course will show on your Canvas dashboard or you can visit the Student Accommodation Resource Center. This resource course is intended to have pertinent information and more detailed information about your specifically approved accommodation.  You are not required to accept the invitation - though, we do recommend it so you can stay informed.

Not seeing the course? Let us know and we can check your invitation status!

Quick Resources - Current Students

Students are responsible for declaring academic accommodation(s) each term in AIM; we recommend doing so as soon as possible to the start of the term.  It is recommended that you communicate with your faculty before or at the start of the term to understand how your accommodation(s) will be supported in their course.  This will help you request the accommodation(s) that are applicable to the course.  It is strongly recommended that if there is a course that you do not need to request accommodations that you indicate that for the course.  It helps the faculty and our office know your needs for the term. (And you can change it at any time!)

Step 1 - Log Into AIM

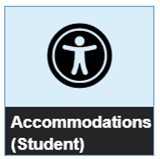
Log Into TechWeb using your OIT credentials, and navigate to the “Accommodations (Student)” tile:

Accommodation tile in TechWeb with silhouette of person in a circle


Step 2: Accessing the “Request Accommodations” module

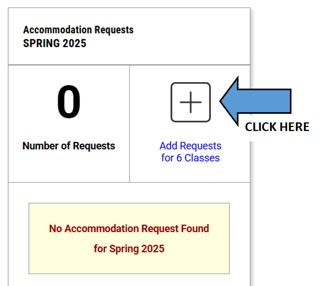
On your Student Dashboard in AIM, you should see the “Accommodation Requests” dialog box with the specific term (ex. SPRING 2025 in example below).  This dialog box will show you 1) how many courses you have enrolled in and 2) the number of courses (if any) that you have requested to use any accommodations.  The next screen will show you the specific course titles/information.

A screenshot of the Accommodation Requests dialog box on the Student Dashboard with an arrow pointing to the button/link to "Add Requests for Classes"

You will need to click the “Add Requests…” link (or box with the plus-sign) to progress to the screen to select courses for the term that you wish to request accommodations.


Step 3 - Selecting Course(s)

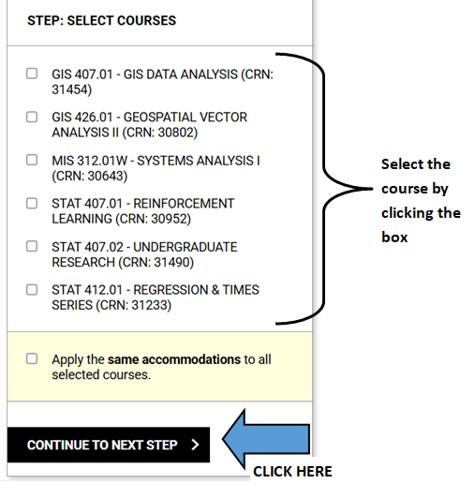
From the “Select Courses” listing, select the course(s) that you want to request accommodations for the term, and then click the “Continue to Next Step” button to proceed to the screen to select specific accommodations for the course(s) you selected.

Note: If your courses are not displaying or you are missing some, please contact our office.  AIM communicates with OIT’s Banner system for course registration info, so if courses are missing, we will need to see where the disconnection is happening.

A screenshot of the "Select Courses" menu with the list of term courses the student has registered for, with arrows to the boxes for each course and another arrow to the button to "Continue to Next Step"

If you only have a small number of accommodations or you know that you want to request the same accommodations for all courses, you can click the box for “Apply the same accommodations to all selected courses”.  However, if you have multiple types of accommodations or may have different requests for different courses, this box is not recommended. 


Step 4: Selecting Accommodation(s) & Submitting

You have control to make your requests specific to the course and your needs and that is what we recommend. For example, if you have a course that you know you will not need accommodation or maybe one but not all, please make your selections accurately.

NOTE: Remember that you can modify your accommodation selections later, however, they cannot be retroactively applied.  If you have questions, always contact our office or your DS Advisor for guidance or advice.

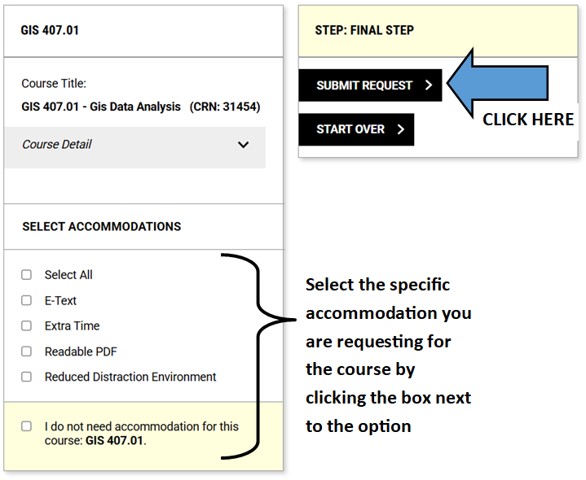
Once you have made your selections (or clicked the box indicating that you do not need accommodation in the course), you will click the “Submit Request” button located in the “Step: Final Step” box to the upper-right of the selection menu:

A screenshot of the "Select Accommodations" menu with arrows for the accommodation boxes and another arrow to the "Submit Request" button

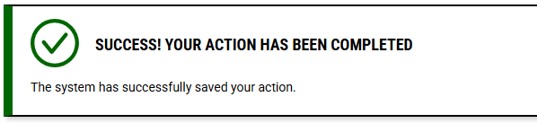
After clicking the “Submit Request” button, you should see a “Success! Your Action Has Been Completed” banner, confirming that your request(s) were successful, and notification to your course instructor(s) will be sent.


Screenshot of the confirmation banner that the action was successful.  Message reads: "Success! Your Action Has Been Completed" with a green check mark.


Important note: These directions are only applicable if you are using the Testing Center.  If you are taking an exam outside of the Testing Center (ex. in the classroom, remotely, instructor's office, etc.), you should not follow these steps.

Step 1: Log Into AIM

Log Into TechWeb using your OIT credentials, and navigate to the “Accommodations (Student)” tile: 

Accommodation tile in TechWeb with silhouette of person in a circle

Step 2: Accessing “Alternative Testing” module

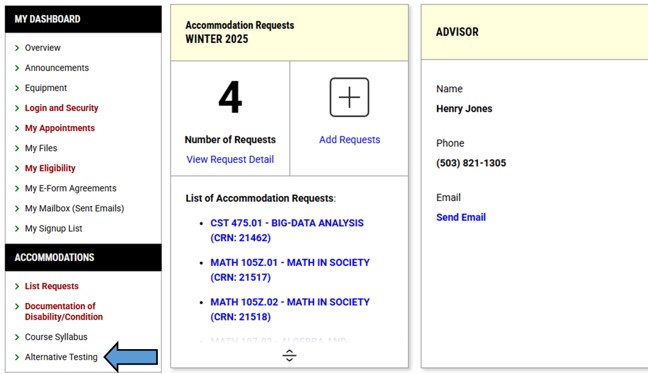
Click the link for the “Alternative Testing” module in the ‘Accommodations’ side menu; it should be near the bottom of the ‘Accommodations’ side menu:

Screenshot of AIM Student Dashboard with arrow pointing at "Alternative Testing" module link

Step 3: Scheduling an Exam

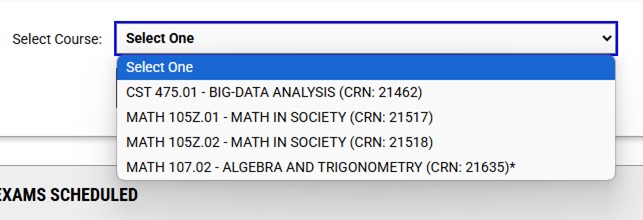
From the “Select Course” drop-down menu, select the course that is having the exam.  

Screenshot of course selection drop-down menu displaying student's current courses

If the course has an asterisk (*), that means that your instructor has not completed an Alternative Testing Agreement (ATA) for the course, so the system will prompt you for additional details (ex. date, time allowed, etc.) that otherwise would be provided by the instructor in the ATA.  Students cannot complete the ATA - so if you receive a notification about an incomplete ATA, that is the system informing you that the instructor has not completed it; it is not a prompt for the student to complete it.

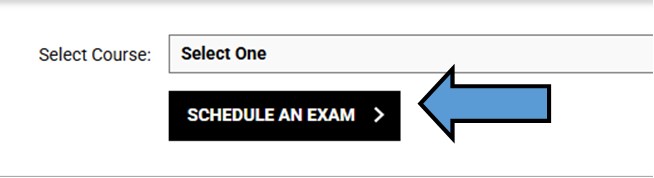
Once the course is selected, click the "Schedule an Exam" button below the drop-down menu.

Screenshot with arrow pointing at "Schedule an Exam" button

If Your Instructor Has Provided Exam Dates

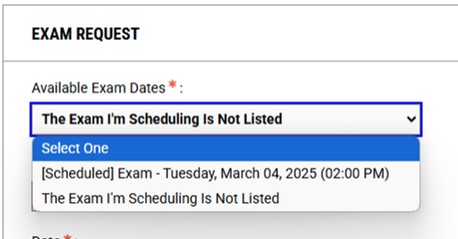
If your instructor has provided exam dates in the ATA, they will appear in the drop-down menu of "Available Exam Dates".  You will need to select the appropriate exam, which will link your scheduled exam with the exam details your instructor provided.  If you schedule for a different day/time than what is listed, your instructor will be notified and - if not an approved reason - you will be prompted to change your schedule to overlap with the date/time that your instructor has provided.

Screenshot of "Available Exam Dates" menu listing all provided exam dates or option to select a date not listed

If Your Instructor Has Not Provided Exam Dates

If your instructor has not provided exam dates in the ATA, in the drop-down menu of "Available Exam Dates", you will need to select: "The Exam I'm Scheduling Is Not Listed".  This will prompt you to provide the system with the exam details:

  • Exam Type = exam, quiz, midterm, final
  • Exam Date = the day the exam is scheduled
  • Exam Time = the time you are starting your exam
  • Standard Length of Exam (in minutes) = the amount of time that the class is receiving for the exam (ex. 50, 60, 90, 120, etc.)
  • Services Requested (if any) = checking the appropriate box if using any approved testing accommodation

The system will display a summary of information you provided.  Your instructor will be notified of your scheduled exam, and you will be prompted to change your schedule to overlap with the date/time that your instructor has provided.

Submission & Success

After required information has been provided, you will scroll to the bottom and click the "Add Exam Request" button.

The page should automatically reload and the page should display a success banner that reads: "Success! Your Action Has Been Completed"

You can repeat the steps to schedule any additional exams for the course.

Important Reminders

  • Only the instructor can complete the Alternative Testing Agreement (ATA)
  • You should schedule your exam in the Testing Center as close to the scheduled class time as possible; ideally, overlapping with the class exam
  • If you have an Extra Time accommodation that will conflict with another class, you should schedule your exam in the Testing Center when a conflict is not being created.  We do not want you skipping class to use your approved accommodation.
  • If using the Testing Center for your course exams, we strongly encourage you to schedule them for the entire term during Weeks 1 and 2, before you get too busy with schoolwork and other activities.

We strongly discourage sending documentation to our office through email.  Rather, you should upload any additional documentation requested of you directly to AIM.

You may be directed by our office or your DTS Advisor that you need to provide additional documentation. This is most commonly used when wanting to be approved for additional accommodation or when keeping documents/records updated and accurate for an Emotional Support Animal (ESA) accommodation.  When you upload documentation directly into AIM, your DTS Advisor will be automatically alerted.

1- Log Into AIM through TechWeb

Accommodation tile in TechWeb with silhouette of person in a circle

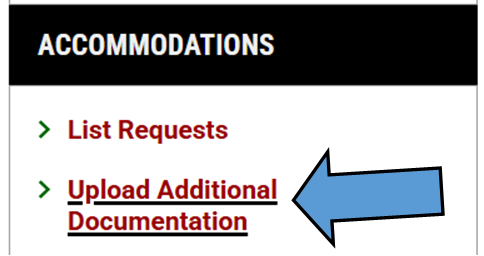
2- Select "Upload Additional Documentation" from the AIM menu

Screen shot with arrow pointed at "Upload Additional Documentation" link in AIM

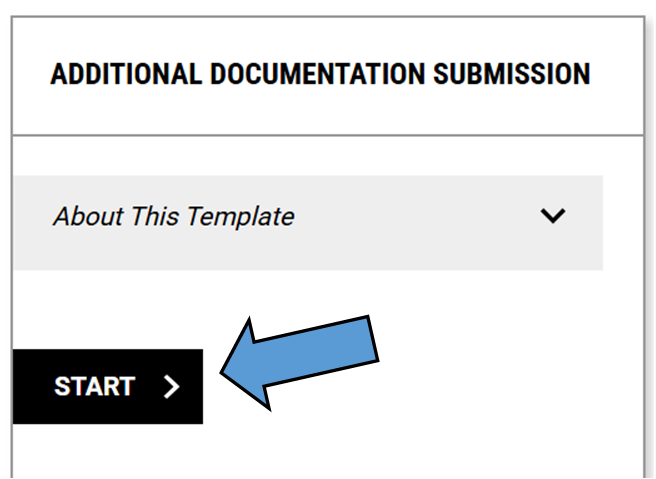
3- Click the "Start" button in the 'Additional Documentation Submission' section

Screenshot of arrow pointing at "Start" button in submission section

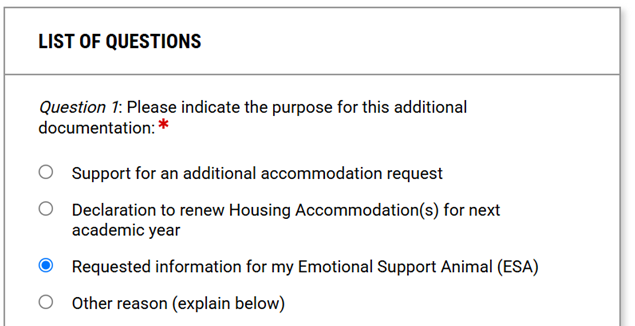
4- Select the reason you are providing additional documentation

Screen shot of screen where student selects reason for the additional documentation

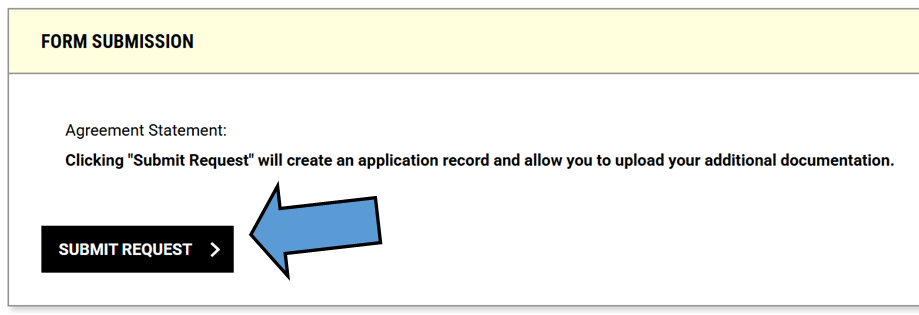
5- Click "Submit Request" in the 'Form Submission' section

Screen shot of arrow pointed at "Submit Request" button in the submission section

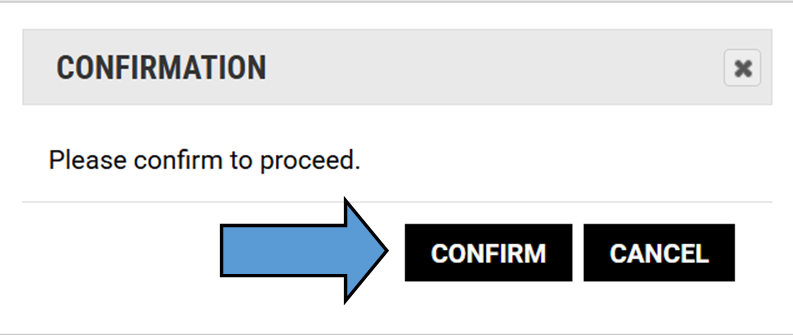
You will need to confirm the action by pressing "Confirm" from the pop-up dialogue box:

Screen shot of arrow pointed at the "Confirm" button in the pop-up confirmation message

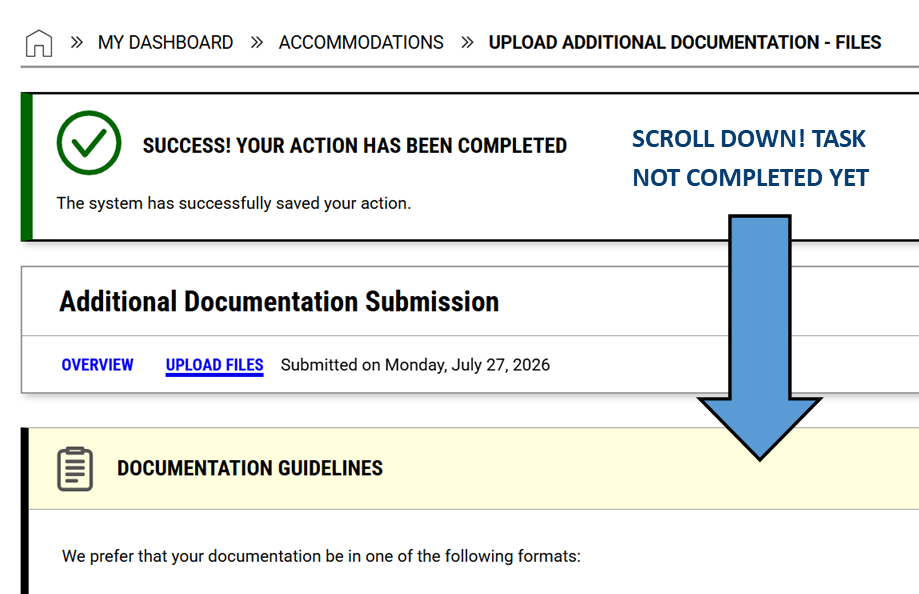
You should see a "Success!" message banner but you have not finished the task yet; you will need to scroll down to the upload section:

Screen shot of 'Success!' message, with arrow and added text directing you to scroll down

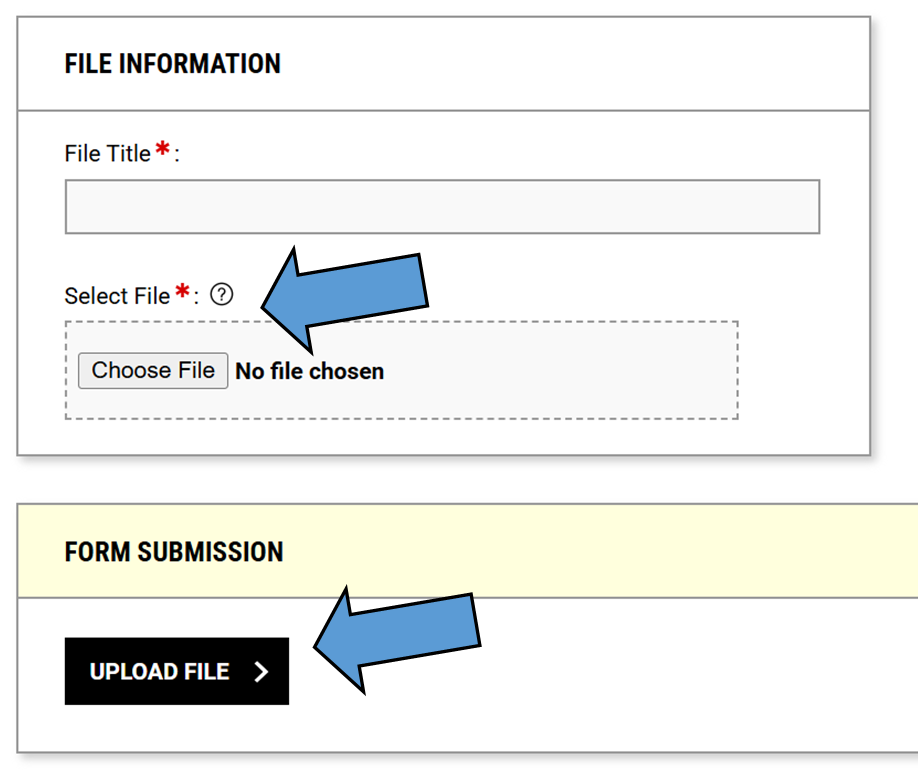
6- Select the document(s) you want to upload in the 'File Information' field.

Then click the "Upload File" from the 'Form Submission' section

Screen shot with arrows pointed at the "Select File" button, to attach document, and at "Upload File" button


For our office to be able to discuss your accommodation with an external person (ex. parent/guardian, spouse/partner, medical provider, etc.), you need to authorize that communication.  We prefer that you authorize it in AIM since that is the system that our office uses the most.  Here is how to complete an authorization form directly in AIM:

Step 1 - Log Into AIM through TechWeb

Select the "Accommodation (Student)" tile from TechWeb to log into AIM.

Accommodation tile in TechWeb with silhouette of person in a circle

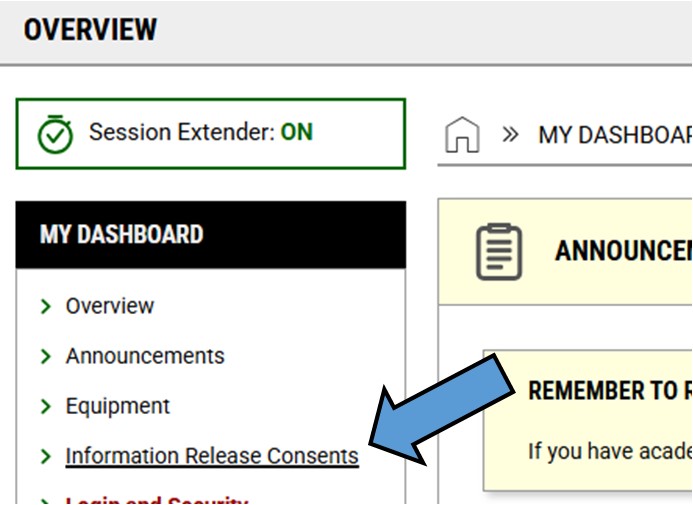
Step 2 - Select "Information Release Consents" link from the menu

Screen shot of arrow pointing at the "Information Release Consents" link in the 'My Dashboard' menu


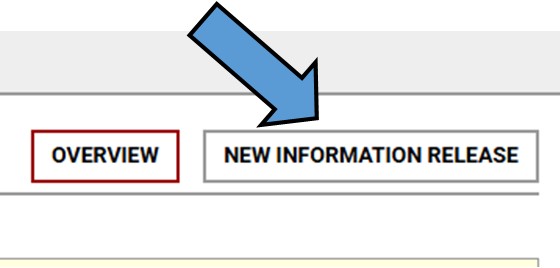
Step 3 - Select "New Information Release" button

It is located in the top right corner of the overview screen.

Screen shot of arrow pointing to the "New Information Release" button


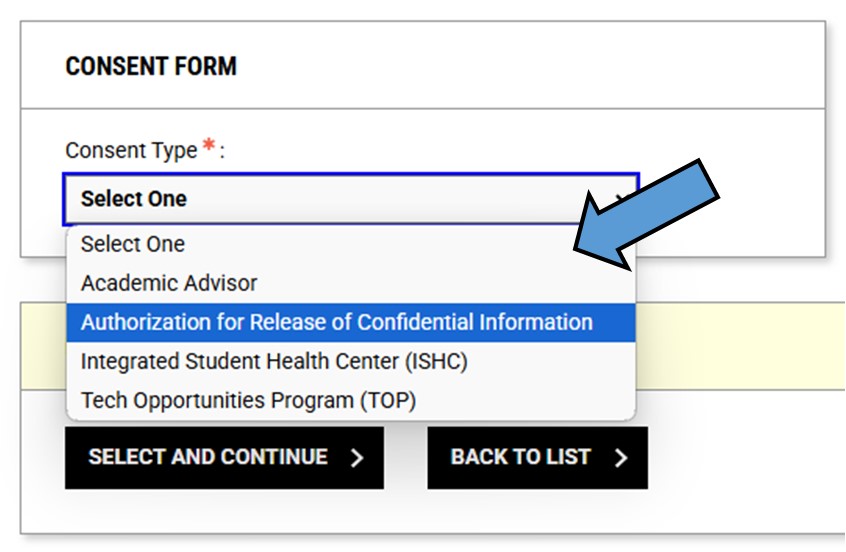
Step 4 - Select the authorization form you want to complete

There are a few options in the drop-down: Academic Advisor, ISHC, and TOP are internal Oregon Tech releases; for this purpose, you will want to select the "Authorization for Release of Confidential Information" option.

Screen shot of arrow pointing to 'Consent Type' drop-down list with "Authorization for Release..." highlighted/selected


Step 5 - Complete all of the required fields

Each form has their own set of required fields that are indicated with a red star.  The duration for each release is defaulted to 1 year (365 days), however, this can be adjusted by using the date selector.


Step 6 - Submit the form

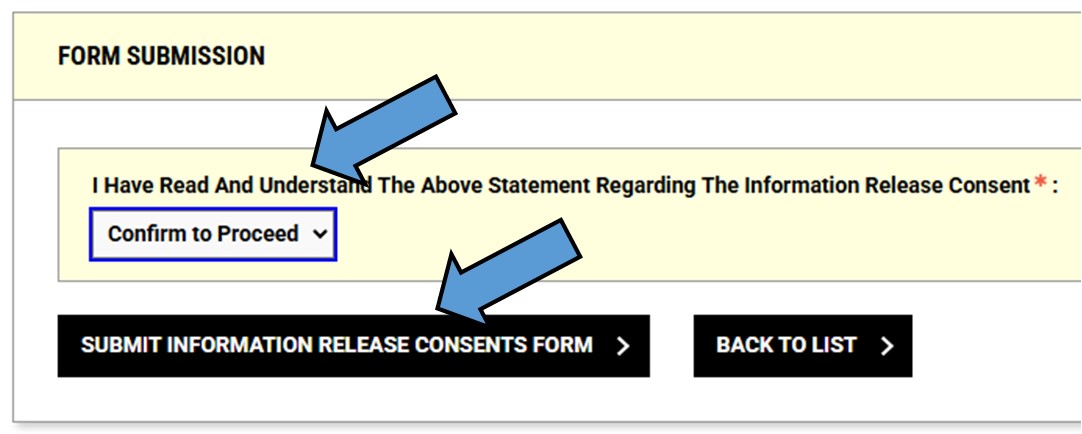
Once you have completed all the required fields, scroll to the bottom and change the status to "Confirm to Proceed" and then click the "Submit Information Release Consents Form" button to submit the form.

Screen shot of arrows pointing at the "Confirm to Proceed" status and the "Submit Information Release Consents Form" button


Modifying/Viewing Completed Forms

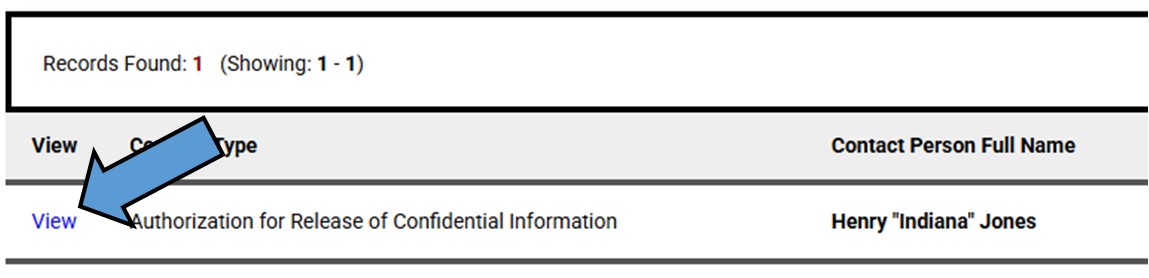
Once you have an authorization form completed, it will be visible in the “Information Release Consents” module overview. To view or make modifications, click the “View” button next to the form and it will take you back into the form to make modifications or to view current authorizations.

Screen shot of arrow pointing at the "View" link for a completed, active authorization release form


Deactivating Your Authorization

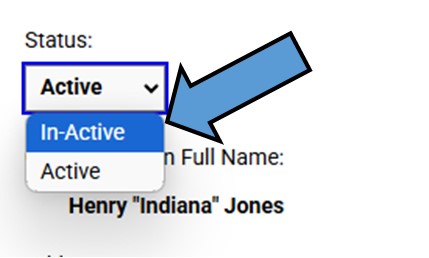
If you decide later that you wish to change your authorization, you can go into the “Information Release Consents” module (Step 1 above), then click “View” next to the Release Form. Once in the form, scroll down and you should see a “Status” drop-down menu that is set to “Active”; selecting that menu and changing the status to “In-Active” will deactivate the authorization.

Screen shot of arrow pointing to the "Status" menu with displayed options to make a release active or in-active